Skype for Business allows you to send instant messages, make audio & video calls and host online meetings with screen & file sharing.
You can connect with people at NBI or external to our organisation.
Get started with Skype for Business
Skype for Business is included in Office 2013, 2016 and 365 ProPlus for Windows. (Note: some features are only available in Office 365 ProPlus – available in the ‘Software Center’)
Macs with MacOS 10.11 or above and with the Managed Software Centre will automatically receive the standalone Skype for Business client.
For home computers, tablets and smartphones please see these pages for Windows / Mac and tablets / smartphones.
Skype is also available in the Outlook on the Web portal at https://outlook.com/nbi.ac.uk
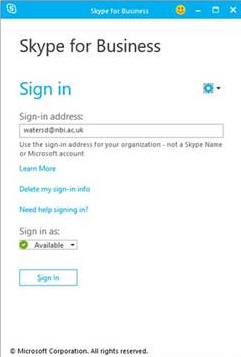
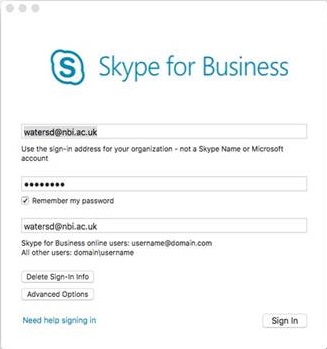
To get started, launch Skype for Business and login using your UPN (format: username@nbi.ac.uk)
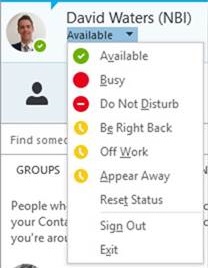
Presence information
Presence is a quick way for other people to see if you’re available. You can see someone else’s status in Outlook or Skype.
Your status is automatically set based on your Outlook calendar but you can set it manually if you don’t want to be disturbed.
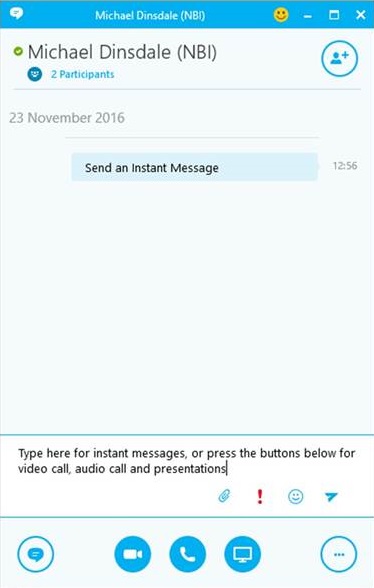
Instant Messaging
Instant messaging (IM) is an efficient way to send quick messages to your contacts. You can send text, images and files to one person or a group of people.
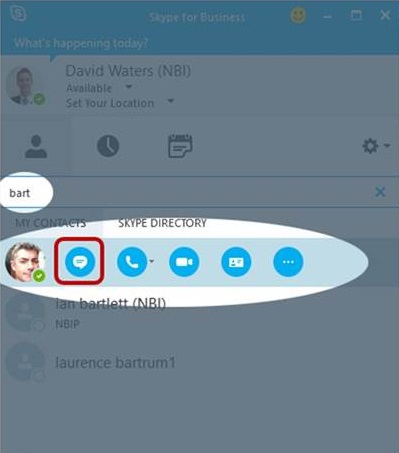
Use the search box to find people and then double-click on their listing or hover over their picture and click the IM button.
You can even search for external Skype users in the Skype directory or by using the format SkypeID@skypeids.net
Quick Tip: You can hover over a person’s picture in Outlook to start a Skype conversation.

Type your message at bottom of the conversation window. To send a file or an image you can drag and drop or copy and paste into the chat window.
Audio & Video Calls
Point to a contact’s picture and click on the audio or video buttons to start an audio or video call.
![]()
You can also add video to an existing instant messaging (IM) conversation. Click on the buttons at the bottom of the chat window.

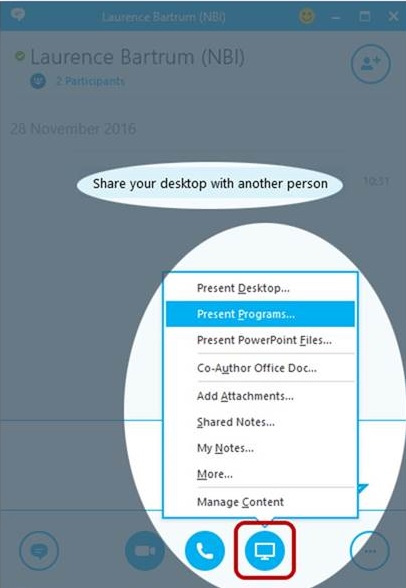
Screen Sharing
You can share your screen with everyone in a Skype for Business meeting, call, or instant messaging (IM) conversation.
Click the Present button and select your entire desktop, just one program or a PowerPoint presentation. You can also give another person control of your screen, share a whiteboard and add attachments.

Schedule an Outlook Meeting
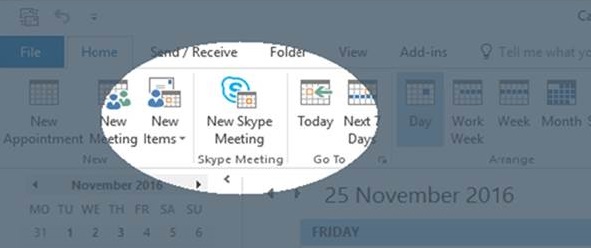
You can use Outlook or Outlook on the Web to schedule a Skype meeting in the same way that you’d normally schedule meetings.
External contacts don’t need to have Skype for Business to join your meeting – they can use the link to the Skype for Business Web App which is included in the meeting request.
To schedule in Outlook, go to your calendar and select New Skype Meeting.

Set up the meeting as you typically would:
- In the To box, type the email address of each person you’re inviting, separated by semicolons.
- In the Subject box, type a name for the meeting.
- Select a start time and end time.
- Review the Meeting Options

- Click Send.
Set up an online meeting using Outlook on the Web, first login to https://outlook.com/nbi.ac.uk
- In the Office 365 portal, click the app launcher, then click Calendar to open the Calendar app.
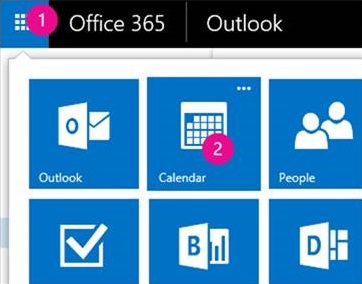
- Click the plus sign or New just below the app launcher, and then click the Skype Meeting button

- Fill in the meeting information as usual.
- (Optional) In the meeting area, you can type an agenda or other information about the meeting. Be careful not to change any of the online meeting information and the attendee will use thislink to connect to the meeting.
- At the top of the meeting window, click Send
More information
Skype for Business Help
Quick Start Guides
Presence Status
Instant Messaging
Audio & Voice Calls
Screen Sharing
Skype for Business Meetings